• Hello there guest and Welcome to Fox Body Mustangs forum, This forum is intended to be used by enthusiasts of the Fox body Ford Mustangs (1979-1993)!
    To gain full access you must Register. Registration is free and it takes only a few moments to complete.
    Already a member? Login here then!

First Fox/First Project - 1988 GT "Zorro Blanco"

broncojunkie

Well-Known Member
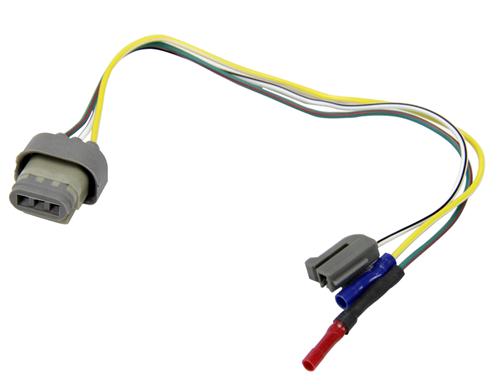
It's been so long since I've done my 88 that I can't quite remember. I do know that I completely removed the black/orange wires. They go straight to the stud on the fender relay (at least they did on my 88). I have a new grey plug that connects to the voltage regulator on the back of the alternator. Now... how I wired that in is the part I can't remember, but I do know that new plug has a white wire coming out of it, which I connected to the single small connector on the back of the alternator. Basically, it's just a short jumper wire from the vr to that spot.

I have done the 3g swap in the pace car as well, but '79 was quite a bit different. If I was home, I would post pics.... but I won't hit dry land for another 12 days.
 

DudeStang

Member
It's been so long since I've done my 88 that I can't quite remember. I do know that I completely removed the black/orange wires. They go straight to the stud on the fender relay (at least they did on my 88). I have a new grey plug that connects to the voltage regulator on the back of the alternator. Now... how I wired that in is the part I can't remember, but I do know that new plug has a white wire coming out of it, which I connected to the single small connector on the back of the alternator. Basically, it's just a short jumper wire from the vr to that spot.

I have done the 3g swap in the pace car as well, but '79 was quite a bit different. If I was home, I would post pics.... but I won't hit dry land for another 12 days.
Thank you! All good, I think I might have a clear path forward based on some conversations in other forums. Will hopefully have an update tonight or tomorrow. :cool:
 

Redtwilight

Shinigami
I got rid of the black/orange wire altogether. In its place I ran the new 4ga (the SR Performance that you also ordered).
I also used the 2g to 3g conversion wires that Broncojunkie linked.
You splice the yellow and green wires into the factory harness. The white wire goes to a separate connector. It appears that this has already been done to yours.
So basically you'll just replace the blk/org wires with the new larger wire with the fuse.
 

DudeStang

Member
I got rid of the black/orange wire altogether. In its place I ran the new 4ga (the SR Performance that you also ordered).
I also used the 2g to 3g conversion wires that Broncojunkie linked.
You splice the yellow and green wires into the factory harness. The white wire goes to a separate connector. It appears that this has already been done to yours.
So basically you'll just replace the blk/org wires with the new larger wire with the fuse.
Thanks....I think I sort of got it figured out, at least in theory.

Following up on the alternator cable issue - I wasn't able to re-use the ring terminal from the green wire and all the ones I have (that came with my cheap, crappy wire stripper) are too small. So I am waiting on some of those to arrive in the mail. I also ordered some more wire loom tubing, wiring harness clips, cloth wiring tape, and electrical tape.

In the meanwhile, I managed to make a little bit of progress using the POR 15 on the area underneath the battery tray (wheel well side). Unfortunately, I didn't think ahead and planned poorly with brush usage, so I have to wait until I get some more brushes before I can get to the engine bay side. I have some cheap brushes ordered for curbside pick up so fingers crossed that those are actually in stock). I managed to get two coats of the POR 15 on with the two brushes I had available.
IMG-9701.jpg

Once I get the brushes, I should be able to get some more rust work done and then eventually get the alternator cable situation squared away. Oh, in other exciting news, got a new t-shirt (and HP sticker) via Blipshift that I think some folks in this forum will appreciate.
IMG-9693.jpg

Anyways, here's my latest video documenting recent progress:
 

DudeStang

Member
I got these in the mail today (cheapest, quickest thing I could have delivered that seemed to be the right size) but now I'm wondering if I should try to find something that is copper or silver. This would be for the yellow/brown wire that runs from the alternator, to connect at the starter solenoid.
IMG-0152.jpg

Also, I made some progress on applying the POR-15 kit on the frame underneath the battery tray. I will likely need some more of the POR-15 to get the shock tower done. On the shock tower though, I'm wondering if it would make sense to remove the master cylinder (and how difficult that is) in order to apply the POR-15 better. It's not the easiest space to get into. Any thoughts or suggestions?
IMG-0109.jpg

Back to the horn issue...I was finally able to get the screw out of the horn bracket, thanks to the torch idea. I found a couple of random screws that actually fit in the holes on the bracket (looks like they are from IKEA) but they fit in the bracket pretty tightly and they are too narrow for any of the holes on the frame. For now, I used some washers and attached both horns to the same hole but with that placement, I can't get the fender protector back in and I'm also wondering if the second horn is too close to where the tire will turn in. I will carefully test it out once I get the alternator and battery hooked back in.
IMG-0108.jpg
IMG-0106.jpg
IMG-0107.jpg

I am thinking I might need to just have someone weld the bracket back in eventually.

Anyways, I documented some of these things in my most recent video. I welcome commentary, lol.


DudeStang

Member
So on another forum, someone pointed out that my brake lines look like they might be copper. My car has a rear disc brake conversion but it looks like whoever did it kept the factory master cylinder and made custom lines coming from that MC.
IMG-0354.jpg
IMG-0355.jpg

A few folks have chimed in that copper lines are not good and that I should try to address this. Initially I was looking at purchasing the 1993 Cobra Master Cylinder, which appears to be somewhat of an upgrade, and can fit on 87-93 GT Mustangs without major modifications. The problem I'm anticipating though, is the Maximum Motorsports master cylinder installation kit doesn't appear to include the front port brake line, which I obviously need to replace too. I'm not seeing any front port lines available on MM or LMR.

I also looked at the 94-95 Cobra MC on MM and it looks like their installation kit does include a complete line kit. Anyone have thoughts on the 94-95 Cobra MC for a mostly stock 1988 GT?
 

broncojunkie

Well-Known Member
If you think you may do a 5-lug swap and upgraded brakes (larger fronts and disc rear), then I would suggest doing it all at the same time. It tends to start a snowball effect lol! If you're concerned about the front lines, LMR sells the stock setup. But honestly, you can do it with a tubing bender and flare kit. It won't be any cheaper, but you'll have the tools and experience for next time. With only a mc upgrade, you won't see a performance improvement other than decreased pedal effort. It may even make the brakes feel too "touchy" for your preference. I have the cobra mc and sn95 booster in my pace car and it's fine, but the extra fluid movement is needed for the sn95 front calipers. I may do rear disc at some point, but the brakes seem very good as-is.
 

DudeStang

Member
If you think you may do a 5-lug swap and upgraded brakes (larger fronts and disc rear), then I would suggest doing it all at the same time. It tends to start a snowball effect lol! If you're concerned about the front lines, LMR sells the stock setup. But honestly, you can do it with a tubing bender and flare kit. It won't be any cheaper, but you'll have the tools and experience for next time. With only a mc upgrade, you won't see a performance improvement other than decreased pedal effort. It may even make the brakes feel too "touchy" for your preference. I have the cobra mc and sn95 booster in my pace car and it's fine, but the extra fluid movement is needed for the sn95 front calipers. I may do rear disc at some point, but the brakes seem very good as-is.
I think maybe I forgot to mention this earlier in the thread but my car actually has rear disc brakes already....and the front brakes were "upgraded" to drilled rotors, though they look like they are the same size as the factory rotors and everything else looks standard. Given that things have been modified, I wonder if I'd still just be able to do the stock setup or if that would require some more work.
IMG-6663.JPG
 

broncojunkie

Well-Known Member
The rear disc setup might change things a bit. It's my understanding that the factory proportioning valve doesn't work well in this case, because it throws the bias off. To counter this, the common fix is to gut the factory proportioning valve and install an aftermarket adjustable valve on the rear line. You can then dial in the correct front-to-rear bias.

If this has been done, you'll most likely find the adjustable valve installed at the hard line that runs across the top of the firewall. .towards the passenger side. I believe there's another member here that recently went through this, so maybe he can chime in. I'm just going from memory of reading various write-ups on brake upgrades.

I believe you're correct in thinking that the 93 cobra mc upgrade would be better. I just wanted to point out the deal with the pv being the issue that most people stress with rear disc upgrades. I'll also point out that my 79 with later fox v8 rear drums and sn95 front brakes is still using the factory 79 pv and the brakes seem to work perfectly. So just because everyone else is doing it, doesn't mean they're right!
 

DudeStang

Member
So whoever did the brake changes, also added a Wilwood PV
IMG-7411.jpg
IMG-7412.jpg

I'm not really finding much on the 94-95 Cobra brake option. Someone on another forum said they believe the 94-95 Cobra MC is for the 13" Cobra front brakes and that the bore size is different.

Currently thinking the best thing is to order a 93 Cobra MC and the installation kit and then trying a tubing bender kit like you said for the front port brake line or see if I could find something that would work from an auto parts store. I'd really prefer just to be able to get an MC that has both of the right brake lines with it.
 

DudeStang

Member
Happy to report that I finally got the alternator power cable finished. I ended up running the power cable in one loom and the rest of the wires in a separate loom. It took a while but I got it looking how I wanted it, for the most part. I might need to redo the tape around some of the clips but for now, I'm pretty happy. Thanks for the tips on that part especially. Trying to get both looms to sit well and fit underneath the battery tray took the most time.

IMG-0544.jpg
IMG-0545.jpg
IMG-0546.jpg
IMG-0543.jpg

Got a new video up documenting this progress and talking about a few other things:


I went ahead and ordered the 93 Cobra MC and installation kit. I'll try and figure out a solution for the front port line when the time comes.
 

DudeStang

Member
Foster puppy madness has occupied most of our time at the house the past few weeks. I found some time to make a new video but not a ton of progress on the car. The foster puppy goon squad should be gone this weekend so I'm hoping to start working on the master cylinder/brake line project soon. I believe I have everything I need for that but I do still need to pick up another can of POR-15 to use on the shock tower so I can do both of those at the same time.
IMG-0717.jpg


I also ordered the lower door hinge tension spring so I can finally fix the driver side door.
 

DudeStang

Member
Still haven't made a ton of progress recently. In addition to the puppies, I've had a few things come up in the house that we need to work on sooner than later. I am still waiting on the shocks I ordered a few weeks ago. I did install new header panel support brackets...but I should probably take some time to clean up the screws. Still looks better than the rusty ones that I had on there.
IMG-1450.jpg

Also, I ordered a lower door hinge tension spring, since my driver side door won't stay open. I noticed today that the bag is marked a little bit differently. It says 82-83 door check tension arms...the parts in the bag look the same as what is advertised on LMR though, so I'm hoping it's still the right piece, just tagged or bagged incorrectly.
IMG-1448 (1).jpg
IMG-1449.jpg

Also, managed to make some time to clean a bit more of the space on one side of the garage. This area was pretty crowded and a pain to walk through until now. We recently ordered some new shelves to help better organize the garage and maximize space. It's the little things that help sometimes...
IMG-1444.jpg

Made a new video documenting some recent things:
 

DudeStang

Member
Finally got the driver side door able to stay open, by replacing the lower door hinge tension spring.
IMG-1449.jpg

The installation video from LMR definitely made this seem like an easier install than it actually is...at least for me.
 

broncojunkie

Well-Known Member
Those LMR videos always make it look easy. The magic of editing! In their offense, they probably weren't editing the hard stuff to make it look easy. They just couldn't leave all the cursing in lol!
 

DudeStang

Member
Those LMR videos always make it look easy. The magic of editing! In their offense, they probably weren't editing the hard stuff to make it look easy. They just couldn't leave all the cursing in lol!
Lol, probably true....

In the video of the lower door hinge tension spring specifically, it definitely helped that they had the fender removed but that seemed pretty time consuming plus I'm not completely sure the fender can be removed without removing the front bumper cover at the same time.
 
Top