• Hello there guest and Welcome to Fox Body Mustangs forum, This forum is intended to be used by enthusiasts of the Fox body Ford Mustangs (1979-1993)!
    To gain full access you must Register. Registration is free and it takes only a few moments to complete.
    Already a member? Login here then!

Bracing for Convertible Floor Replacement

DaRey8126

New Member
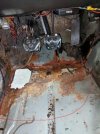
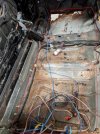
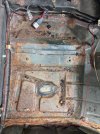
I've always been told bracing must be installed prior to replacing floors on a unibody convertible to preserve the structural integrity of the body while replacing the floors.

I haven't found any posts or videos of people replacing entire floors or side floor pans on convertibles, only hardtops.

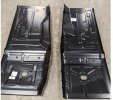
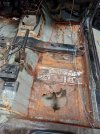
It appears to me the rockers offer substantial structural support. Do I need to install any temporary bracing before cutting out the floor pans? I am planning to only replace each half floor, maintaining the original tunnel.
 

347HO

Active Member
Post a picture of the prefab floor you're installing.
Also post a picture of your driver and passenger side floors and use Microsoft paint or whatever you have to highlight your intended cut lines.

Normally I'd suggest only supporting your entire chassis on 4 corners (leveled), but NOT if you're cutting away the radius sides of the original floors from front firewall to rear torque box areas.
 

DaRey8126

New Member
The replacement panels were purchased from a well known online supplier.

I am still checking the condition of the driver floor. I plan to either replace the entire panel or the front and read separately.
 

Attachments

  • Replacement Panels.jpg
    Replacement Panels.jpg
    140.2 KB · Views: 2
  • Driver Floor with Front Repair.jpg
    Driver Floor with Front Repair.jpg
    101.2 KB · Views: 2
  • Driver Floor with Full Repair.jpg
    Driver Floor with Full Repair.jpg
    113.9 KB · Views: 2
  • Driver Floor with Rear Repair.jpg
    Driver Floor with Rear Repair.jpg
    113.5 KB · Views: 2
  • Passenger Floor with Repair.jpg
    Passenger Floor with Repair.jpg
    111.8 KB · Views: 3

347HO

Active Member
The original pan looks pretty solid on the radius/radii, so you should be able to cut a nice line for the new pan.

Suggest you leave 3/8" edge to overlap and make welding easier.

If you have access to a "flange tool", that may make flushing the seam/parting line of the two flanges even easier and nicer looking.

I also suggest you buy 1/8" cleco's to help hold everything together during your processes.

I'm an old Boeing and aircraft sheet metal tech, and extended my knowledge and tools to automotive custom projects.

Good luck!
Reply if you have questions.
 

DaRey8126

New Member
@347HO I'm not sure I understand what you refer to as the radii sides of the floors. Also, what bracing do you recommend? I am planning to complete the passenger side panel first as it is in the worse condition.

From other research, I understand I will need to remove the front seat cross brace, the inner rocker panel cover and the kick panel plate to access the floor panel to rocker panel connection. Can anyone confirm this? Does the car need to be braced prior to removing the inner rocker?Passenger Floor with Repair - Braces Highlighted.jpg
 

347HO

Active Member
The area to cut is at the radius, bottom of the curve is preferable. You have it outlined with your hand drawn, red line.
 

347HO

Active Member
As for temp bracing, my question is; hhow do you have the chassis supported?
And did you level it out?

If I remember correctly, you still have the transmission mount tying left and right rocker areas together.

You can decide how to proceed after describing how the chassis is supported to the shop floor.
 

DaRey8126

New Member
Jack stands at the four corners of the rockers, one under the steering rack and one under the rear. Leveled based on height of jacks from level floor.

The trans cross member does not run to the rockers. It attaches to the floorboard at the base of the tunnel.
 

DaRey8126

New Member
I understand the rocker is comprised of three separate pieces of steel, the inner rocker, the outer rocker, and a vertical section sandwiches in-between.

I am trying to determine how to remove the inner rocker. It appears the floor attached to the vertical section of the rocker.
 

347HO

Active Member
Level and level... Sounds like you're ready.
Suggest the doors be removed to make access easier.
 

347HO

Active Member
The rockers are spot welded at the "pinch" and each spot weld must be drilled out.
I use a spot weld cutter, but some just drill a hole and weld the hole when going back together.

Same technique removing the cross member if needed.
 
Top