My method for adjusting Headlights
The adjustment screws are upper inside and lower outside screws. If the headlights were re-assembled properly, they will have a 5/32" hex on the screw. You can use a 1/4" ratchet with a 5/32" socket. The upper screws can be reached with the hood up, while the lower screws may require you to lie on the ground in front of the car and reach them from the bottom.
To align the headlights, find a level spot with a wall 25-30 feet away.
Disconnect the driver light or cover the headlight so that no light beams shows on the wall and align up the passenger light so that the light pattern is slightly below of the actual centerline of the headlight. This is to illuminate the right hand side of the road.
Reconnect the driver light or uncover and disconnect the passenger light or cover the headlight so that no light beams shows on the wall
The driver light should be aimed so that the light pattern on the wall is inward about 6" and slightly below the centerline of the headlight. This keeps you from blinding the oncoming cars.
OR putting something like a fender cover over the headlight that isn't being aligned makes adjusting the headlight you’re working on a lot easier to adjust.
Reproduction headlights may shine in several directions at the same time, making it very difficult to align them if both lights are on at the same time.
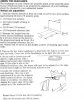
The diagram below is from my 2006 Ford F-150 pickup but gives you a good idea of what I’ve tried to explain.